

Introduction
In this Head Scratcher, we are going to show you four scenarios from developing markets in the southern hemisphere covering the topic of painting roofs. While almost every paint company has one or more roof coatings, whether it is a straight-forward roof paint for metal or tile roofs, a water-proofing coating or a heat reflecting coating, all these options have issues arising from problems in the field.
Scenario 1 – Wrinkling (common)
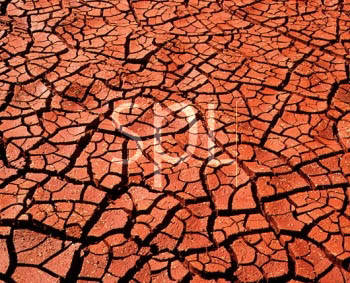
A customer painted a metal roof in a semi desert area in February (summer in the southern hemisphere). The coating was applied in the middle of the day on a building where trees shaded some, but not all, of the roof. The specification was a coat of water-based metal primer and two coats of roof paint. The next day, some areas on the non-shaded portion of the roof showed wrinkling and cracking. What is the exact cause of the problem, how can it be prevented from reoccurring (both from an application and a paint formulation point of view), and what is the solution.
Cause:
An un-shaded roof at lunch time in February, in a semi desert area in the southern hemisphere, will easily reach 80-90 C. When the paint was applied, it seemed dry within a few minutes. (The quicker a job is finished, the quicker the contractor gets paid.) He applied the primer and two top coats within a few hours. Although the surface of the coating seemed dry, the inner portion of the paint was not dry and the water and co-solvents were trapped in film. As they escaped, they caused the observed cracking (often called mud cracking or craze cracking). How do we stop this cracking?
Solution:
- Because it gets light out earlier and stays light longer in the summer, the best time to apply paint is from 06:00 to 09:00 and 15:00-18:00.
- Apply thin, even coats and allow at least three hours (preferably four hours) between coats to allow thorough drying.
- The paint company sent 500ML of propylene glycol to add to 20L of paint. Propylene glycol slows the drying time, so the film stays open for longer, resulting in a decreased chance of cracking. To correct the roof, the very badly cracked areas were scraped to bare metal. Primer and the modified top coat were applied, allowing at least three to four hours between coats.
Scenario 2: Delamination of current paint on very old, previously painted old roofs (uncommon)
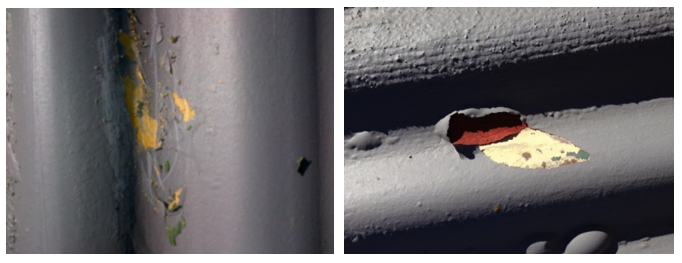 In certain parts of the ex-British Colonies, most older buildings were roofed with galvanized iron sheets. They were primed with calcium plumbate-based alkyd-based primers. They were then top coated with either alkyd-based roof paints or WB roof paints or water-proofing. Today, the system is failing.
Thirty-seven years of experience tells me that the safest way to correct the issue is to strip all old coatings off and then prime and recoat or waterproof. Because this option may not be possible or cost-effective, what are other options and why?
Cause:
The revealed yellow areas are calcium plumbate primer which, up to the late 1990s, was the most common oil- or alkyd-based primer for clean galvanized steel. The calcium plumbate mopped up small amounts of organic acid produced by the alkyd curing/cross linking process. It prevented a reaction with the zinc metal known to form a white salt, causing poor adhesion.
Unfortunately the calcium plumbate primers had a short recoating window of 24-48 hours resulting in additional adhesion issues. In effect, the bond between the original primer coat and subsequent coats was suspect. This problem normally manifests itself later after the roof is repainted many times. The tension caused by the drying of the last coating finally breaks the suspect adhesion bond between the primer and the first applied set of top coats, and the whole system fails back to the primer.
Solution:
The only real solution is to remove all the layers back to bare, bright metal and start again. On some of these 30-50 year old roofs, it is easier said than done. Most people try to grind off the primer with a grind disc that gets extremely hot. The calcium plumbate primer film, which is still slightly thermoplastic, “melts” and reforms. Unfortunately, the only way to remove the primer layer is sanding, which is time-consuming and dust-producing. This dust is a health hazard, so operators must wear and use the correct safety equipment.
Once the metal is bare, it is primed, re-coated and water-proofed with a water-based system. Some contractors feel that is less expensive to replace the galvanized sheets and treat the project as new work. For some historic-listed buildings, this is not always possible.
Need help finding roof coatings?
Prospector can help speed along your research with technical datasheets and access to global equipment suppliers.
Search roof coatings here
Scenario 3: Water-proofing delamination fibre (uncommon)
In a Mediterranean port city that sees summer sun and winter rainfall, a customer water-proofed and painted a 15-20 year old fibre cement roof. It was never painted, so cost was an issue. The contractor decided to used two coats of a black fibre-filled water-proofing since the system recently showed signs of failure.
 Cause:
- The 15-20 years of exposure to sun, wind and rain compromised the integrity of the surface of the fibre cement. It left a very porous, friable, under-bound substrate.
- This substrate, in a hot summer climate and a wet winter climate, is a perfect environment for the growth many species of fungus and algae. Because the fungus and algae make the fibre cement substrate even more porous, friable and under-bound, it must be removed before repainting.
- To adhere to this substrate, even if the substrate is clean and fungus- and algae-free, a first coat is required to penetrate and bind up the friable, porous and under-bound weathered fibre cement. The relatively high-viscosity fibre-filled water-proofing could not penetrate it, so it sat on the surface with no adhesion. It resulted in a very premature failure.
Solution:
- Scrape off the loose and flaking paint.
- Clean the roof with a 1-5% solution of a suitable biocidal wash. It is normally applied with a hard brush to work into the pores of the substrate. Let it set for 30-60 minutes. Then, wash it off with clean water. In this case, the process may have to repeated at least twice to remove all the infestation. Allow it to dry.
- Apply a stabilizing polymer solution to penetrate and bind up the porous, under-bound substrate. In developed countries, this solution will be a nano-sized water-based polymer emulsion. However, in the developing world, it will be either truly solvent-borne resin in solvent or the type of resin that has been emulsified into water. It depends on the local VOC regulations.
- Apply two coats of the fibre-filled water-proofing. Allow six to eight hours between coats.
- Apply two coats of the required coloured roof paint. Be aware that in developing paint markets, some contractors may leave out the roof painting step completely or just apply one coat. It’s all about saving time and cost.
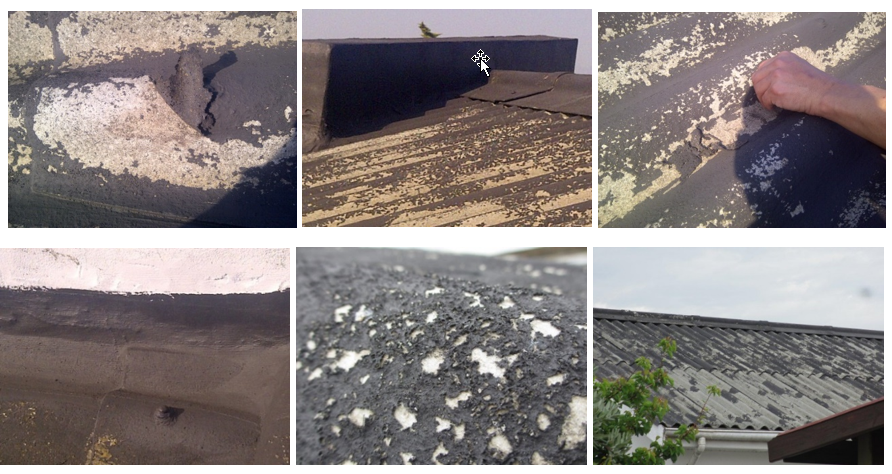
Scenario 4: Roof paint changing colour (rare)
 A large paint company provides a 10-year guarantee on its premium quality all-oxide green roof paint. In 20 years, it has never had a failure, even if only one coat was applied. For the economic quality version of the same colour, a five-year guarantee is offered. However, it was recently withdrawn. It experienced a series of failures on roofs around the country, especially when one coat of the paint is applied directly on unprimed galvanized metal roofs (pictured below). A second coat of the same paint or the premium product solved the problem.
Cause: (Hint: think heat)
When carefully analyzing the issue, we deduce that the following factors are important in resolving this colour change:
- The higher quality product is higher in volume solids and is a higher performance polymer with a more durable pigment combination. Therefore, it does not change colour at the same rate as the cheaper/economic product. The cheaper product shows the problem only when applied to bare metal in low film builds. Heat, thermal conductivity or insulation will affect the polymer type and pigment combination used to obtain the desired colour.
- When observing the image, the worst colour change appears on the overlap/roof joists. The colour has changed from the normal blue tone chrome oxide colour to a yellow colour. This color change most likely involved heat, causing the blue undertone to disappear.
- The most economic way of achieving the desired chrome oxide colour is to take yellow oxide and add a small quantity of a pthalocyanine blue pigment paste. It seems that the zinc on the galvanized zinc metal activated as it got hotter. It then reacted with the pthalocyanine blue pigment forming free radicals that accelerated the breakdown process. It resulting in the rapid colour change. Although we cannot be 100 percent certain, we suspect that free radicals start to unzip the backbone of some polymer types.
Solution: A second coat
So why does a second coat of either the economic product or the higher performance product stop the breakdown process? Again, we cannot be 100 percent certain. However, experience shows that the colour change is caused by film build and is related to free radical absorption and kinetics.
The views, opinions and technical analyses presented here are those of the author or advertiser, and are not necessarily those of ULProspector.com or UL Solutions. The appearance of this content in the UL Prospector Knowledge Center does not constitute an endorsement by UL Solutions or its affiliates.
All content is subject to copyright and may not be reproduced without prior authorization from UL Solutions or the content author.
The content has been made available for informational and educational purposes only. While the editors of this site may verify the accuracy of its content from time to time, we assume no responsibility for errors made by the author, editorial staff or any other contributor.
UL Solutions does not make any representations or warranties with respect to the accuracy, applicability, fitness or completeness of the content. UL Solutions does not warrant the performance, effectiveness or applicability of sites listed or linked to in any content.
Hi Philip, Its so nice to see this article published. Im Christo de Lange,you might remember we worked on some projects at ICC with the breakdown of yellow TLF on Cement pannels. Good times! Im Now stationed at an International company Hexion in Melbourne,focus mainly on the non woven insulation markets, no longer paints. Its good to read your article and it makes a lot of sence. In Australia, however we dont use paint on zinc roofs, it all comes precoated with 20 yrs-gurantee. Concrete tiles are also pre painted and the walls are mostly renfdered with a cementitious polymer coating. Please write to me Ill like to catch up on the good old days.
Very informative paper as UV appears to be getting worse in the Southern hemisphere
and the demand for Grey and Charcoal roof colours has increased.
Christo my E-mail address is [email protected] -Please contact me
I am very happy to say that this is an interesting post to read. I learn new information from your article, you are doing a great job. Keep it up. One must check this Asp.net.nz it gives us more info on this topic.
Thanks Allan Shepherd for your kind remarks – I have been in the World wide Paint Industry for 38 Years , I have Worked in 51 Countries World Wide 21 in Africa
how well define the blog is! Someone can get the knowledge about the roof coatings. There are four types of scenario which are very informative. Define the scenario, cause and solution very effectively. Thank you so much for the information. One must check this Clearandcolour.com it gives us more info on this topic.
How well define the blog is! Someone can get the knowledge about the roof coatings. There are four types of scenario which are very informative. Define the scenario, cause and solution very effectively. Thank you so much for the information. This resource hdpaintingservices.co.nz/ i came across recently and is nice too as this particular site.
Really, it is more helpful for roofing work. I am very glad to go through your wonderful article. Thanks for sharing a nice article.
Very thankful for this wonderful article, it seem like it will really help with what I need to get done. Thank you very much for the post!
Thanks for writing this great article for us. I have gained good stuff from this website. Looking forward to your next article. I am happy to share this post to my friends. Keep it up.